How to dynamically copy specific tables from source systems with Azure data factory

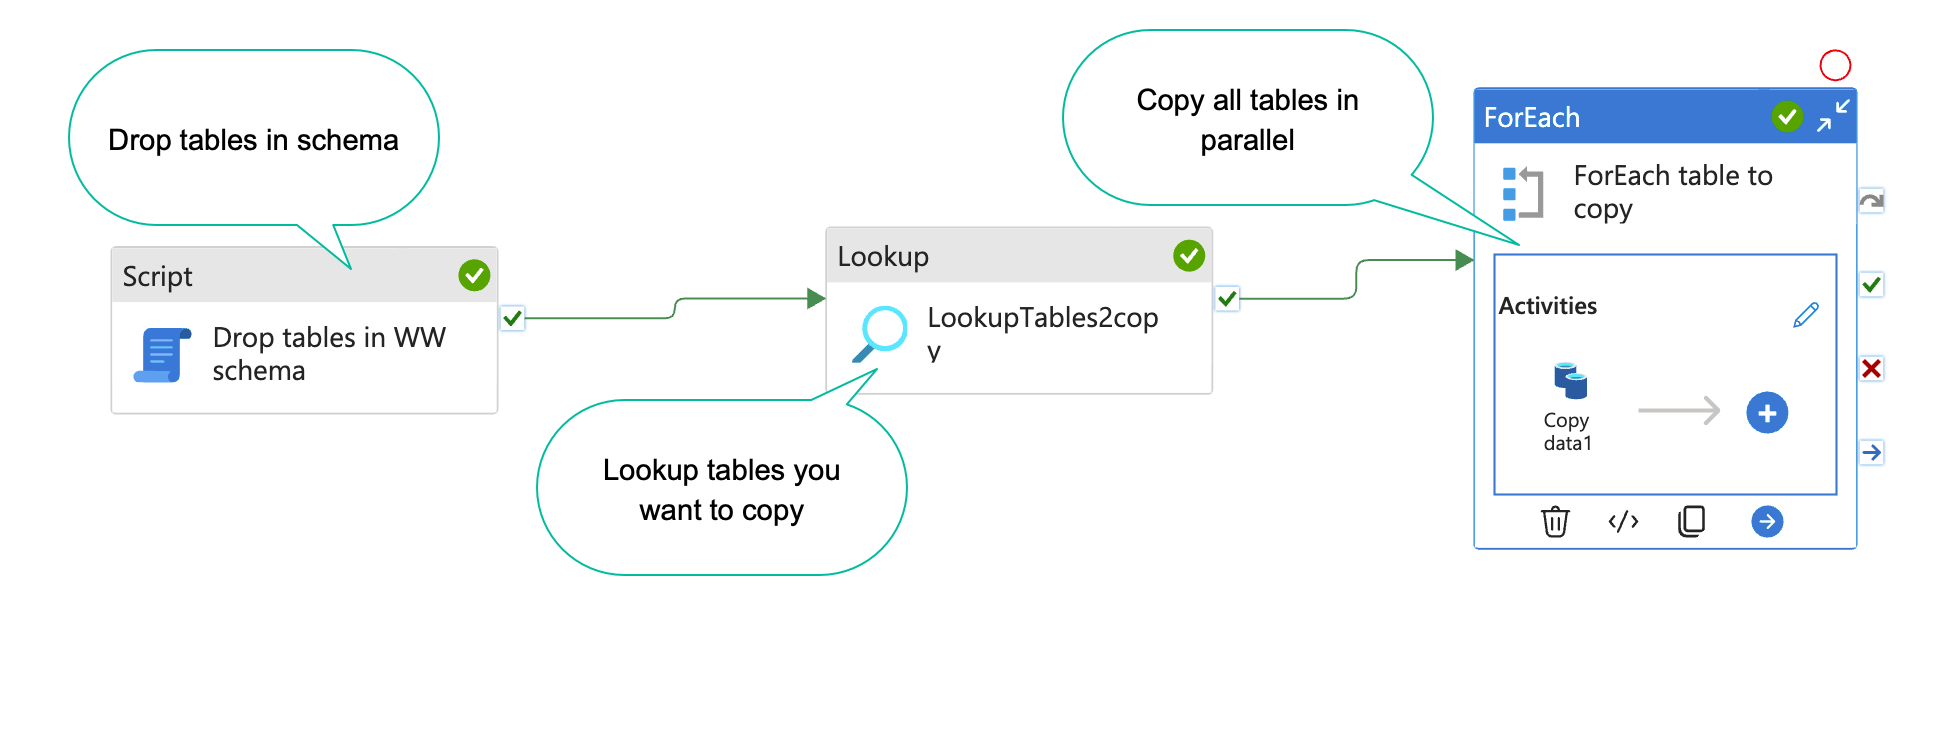
When you are working on a data project, you often have a list of tables you want to copy to your DWH database or staging database. With Azure data factory(ADF), this is easy to set up(Kind of). In this blog post, I will show you how. The result will end up looking something like the image below.

The scenario. I have a source system called WideWorldImportersand a DWH database called DWH_DEV. After talking with the business and the developers, I have a list of tables I want to copy to my DWH. 

In my test scenario, I have the databases on the same database server as shown below, but in real life, that is not the case, but the development process is the same. 

All my work I will do in the DWH_DEV database. First, I want a schema to the sourcesystem. Like so.

CREATE SCHEMA WideWorldImporters

Then I want a table with the tables I want to copy, and information about where to copy them. Like this

CREATE TABLE [Framework].[TablesToBeCopied](
	[SourceSystem] [NVARCHAR](250) NULL,		--The sourcesystem. We can have multiple
	[SourceSchema] [NVARCHAR](250) NULL,		--The Source schema, if it has one
	[SourceTable] [NVARCHAR](250) NULL,			--The Source table 
	[DestinationSchema] [NVARCHAR](250) NULL,	--The Destination Schema in your DWH
	[DestinationTable] [NVARCHAR](250) NULL		--The Destination table in your DWH
)

I want to add the 2 tables [Sales].[Invoices] and [Sales].[Customers]. So my TablesToBeCopied table will look like this: 

When I do a bulk load from different source systems, I want to drop the tables and recreate them again when I copy them. The reason for that is, that I don’t want to worry about remapping columns, if the change datatypes or are renamed. This is maybe not what you need, and then you can just skip this step. But I always create a stored procedure for that, like so

-- =============================================
-- Author:		CKC, DataWise
-- Create date: 20230719
-- Description:	Drop all tables in a schema. 
--				Primarly used for extract tables
-- Parameters
--				@Schema - The name of the schema we want to truncate. 
--				It can not be the dbo schema. 
-- Change history
-- 
--				20230719 CKC, DataWise
--					First version

BEGIN
    /*Declare required variables*/
    DECLARE @SQLStatement NVARCHAR(MAX);

    IF @Schema = 'dbo'
    BEGIN
        RAISERROR('This procedure should not be used on the schema dbo', 16, 1);
    END;

    IF @Schema <> 'dbo'
    BEGIN
        /* BUILD TABLE TRUNCATION SQL*/
        SELECT @SQLStatement =
        (
            SELECT STUFF(
                   (
                       SELECT '; ' + 'Drop TABLE ' + [SchemaName] + '.' + [TableName] AS [text()]
                       FROM
                       (
                           SELECT SCHEMA_NAME(schema_id) AS [SchemaName],
                                  name AS [TableName]
                           FROM sys.tables
                           WHERE schema_id = SCHEMA_ID(@Schema)
                       ) x
                       FOR XML PATH('')
                   ),
                   1,
                   1,
                   ''
                        ) + ';'
        );
        /*EXECUTE TRUNCATION SQL*/
        EXEC sp_executesql @stmt = @SQLStatement;
    END;
END;
GO

Now we are ready to setup ADF

We create a new pipeline and name it something meaningful, like pipelineCopyDynamicFromWorldWide

We start by adding a script task to the pipeline, that will drop the table. We add this SQL to it

EXEC [Framework].[dropTablesBySchema]
		@Schema = N'WideWorldImporters'

After that, we add a lookup task, to get the tables we want to copy.

In the lookup task we add this SQL

SELECT [SourceSystem]
      ,[SourceSchema]
      ,[SourceTable]
      ,[DestinationSchema]
      ,[DestinationTable]
  FROM [DWH_DEV].[Framework].[TablesToBeCopied]
  WHERE SourceSystem='WideWorldImporters'

The pipeline now look like this 

We now want to iterate over the tables with the forreach iteratior. 

We drag it in, and connect to it. We click the settings, and click add dynamic content like below

Then click the get tables to copy like below

Now we want to add an activity in our foreach loop. To do that, click the add activity plus sign, and select the copy data activity like so

Then we setup the copy data activity. First we add the source. Start by connection to a table in your world wide importers database. When you are done, go to the dataset that is created. Click on the parameter tab, and add 2 like this

Then click the connection again, and click the edit button, and dynamiccontent and add the table and schema like so

Do the same with the destination dataset. 

Go to the copy activity again, and setup the source and the sink. The setup should look like this: 

Where you dynamically set the schema and table properties like shown. 

Do the same with the sink(Destination, but use the destination names from your SQL instead). 

Remember to clik the auto create table 

We can now run the pipeline. We should get a result like so

And you should see the table in your DWH like this

As with most in ADF, setting up is a little complicated. But when you are up and running, it is easy to add the table you want in your daily copy job, and it is very easy to maintain. 

You add multiple source systems in your table with the tables you want to copy. I normally create a pipeline for each source system. 

But this is it. I hope you can use it 🙂

Guide: Setup data factory to run locally

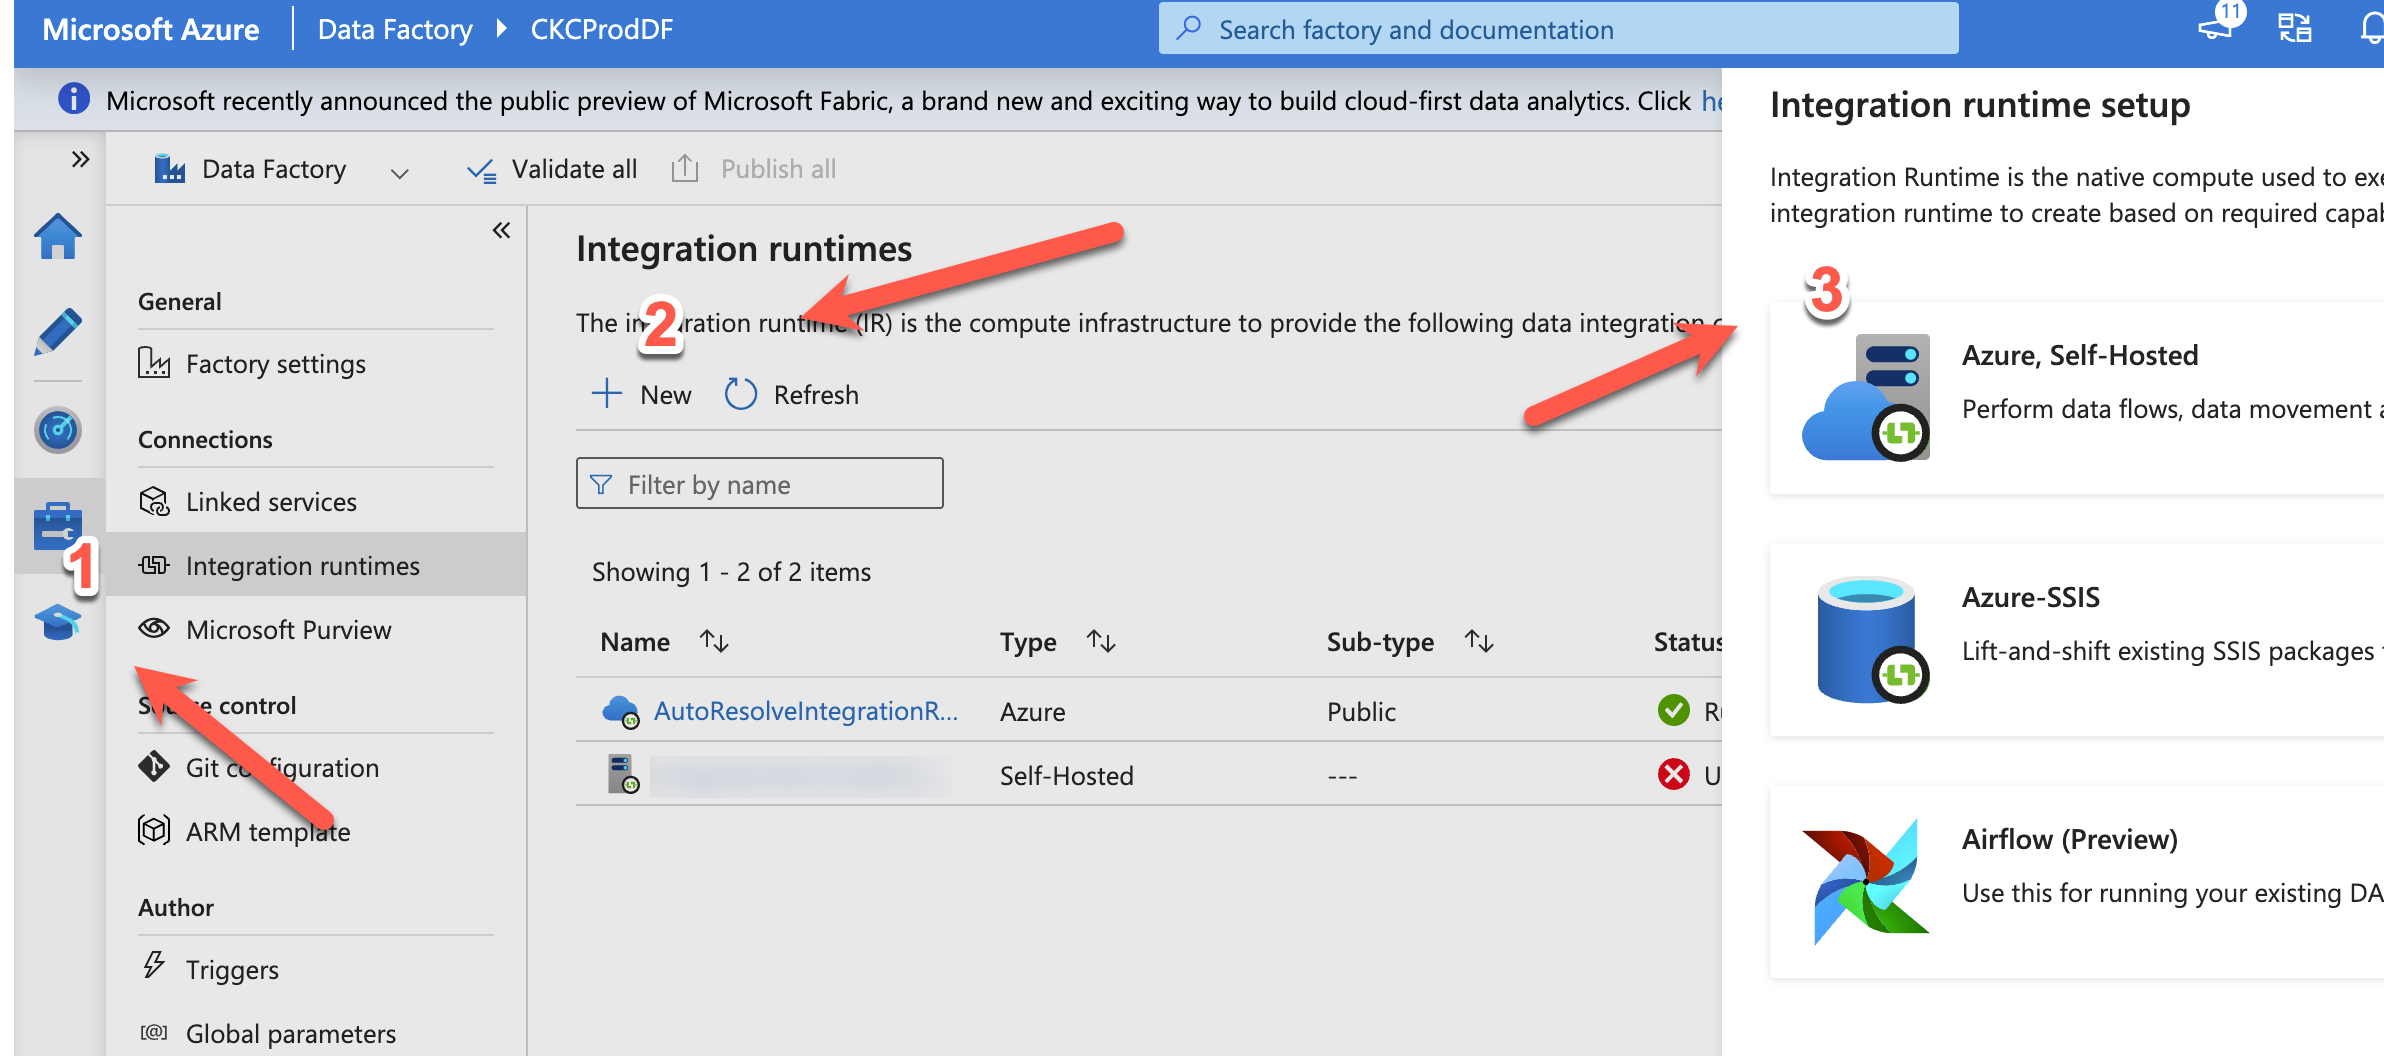
Azure Data Factory (ADF) is Microsofts cloud based ETL tool. It is in many ways, better than their old on-premise ETL tool “integration services”. Luckily, you can easily set up ADF to move data around on-premise. In this blog post, I will show you how 🙂

I will assume you already have an ADF running, and some SQL servers running on-premise (Or on your laptop, if you just want to do it, to test ADF features).

To get started, go to your ADF and

  1. Click the manage menu on the left, click integration runtimes
  2. Click New
  3. Click On, Azure self-hosted

As shown below.

After, click new, give it a good name, and click create.

You will get 2 keys, as shown above(1). Save them a secure place, and click the link with the express setup(2).

When you do the manual setup, you will need the keys. If you just do the express, you don’t need them. After installation, you should see something like this.

We are now ready to use the on-premise resources.

I have a local SQL server with different test databases on it. See below

From ADF I want to copy a table from adventure works to the DWH_DEV database.

To do that, I create a pipeline, and

  1. Drag the copy data task in
  2. Under source, I click new dataset
  3. I click new linked service

And fill in the connection information

Click test, and select the table you want to copy.

Do the same for the destination database and table.

Run the pipeline. You should see a confirmation as below.

You can now copy data with ADF between your databases on-prem, and do all the transformation that is possible i ADF.

You should also be able to do all your testing with ADF as you want, and you dont have to spin up expensive Azure sql servers for all the test databases you want.

I hope this was helpfull 🙂 Enjoy 🙂

Refresh a Power BI dataset from data factory

When I have my data model in my Power BI dataset, there are several reasons, I want to update it when I am done with my ETL. Among others:

  • I don’t know how long the ETL process will take over time, and I want to update the dataset as soon as it is done
  • I want to scale down the database after the power BI dataset updates

So in this blog post, I will show how to do it from data factory (ADF).

It is a lot of steps, and I will assume you have access to your Azure portal, already have created a data factory, and have admin access to your Power BI portal.

Step 1 – The Power BI rest API

To do it, we will use the Power BI rest API. The documentation for how to use the update is here:

https://learn.microsoft.com/en-us/rest/api/power-bi/datasets/refresh-dataset-in-group

where you can see it is a post request like this

Where groupId is the workspace ID, and datasetId is the dataset ID.

To find the workspace ID, go to the workspace in Power BI, and check the URL

It is the guid after the group folder.

Click on the dataset you want to update. The dataset id is the guid after the dataset folder.

Step 2 – Allow ADF to update a Power BI dataset

To allow ADF access to update the dataset is kind of tricky, and we have to use the Azure Active Directory. Go to the Azure portal, and click it. It will look something like this

When you click it, you will see something like this.

Go to the groups as marked in the image above.

Click new group, and create a new group, where the group type is security. Give it a good name 🙂 In my example I use PowerBISP. When it is created, click the members, and click add members, and search for the name of your already created data factory, as shown below. The name of my ADF is CKCProdDF.

Step 3 – Setup Power BI

For this to work, we also need to do some setup in Power BI. First, we need to change a tenant setting. Go to the admin portal by clicking the menus shown below:

Scroll down to developer settings, and add your newly created security group. It should look something like shown below:

The last thing to do in Power BI, is to give the same security group admin access to the workspace where you want to update the dataset.

Step 4 – Create the pipeline

And now, we can finally go to ADF and create our pipeline. In ADF, create the pipeline, and drag in the web component, like shown below.

Check the secure input and output boxes.

Go to settings. It should look something like this

  • The URL is the URL from step 1
  • Method is POST
  • Body we don’t need.
  • Authentication is System Assigned Managed Identity.
  • The Resource is just https://analysis.windows.net/powerbi/api

And now, everything should work. Go ahead and validate and run your pipeline.

When the pipeline is done, go to the Power BI dataset refresh history, and have a look.

You should see a successful refresh, with the type “Via Api” as above.

All Done!!!! 🙂

Conclusion

This is kind of complicated to set up. But when it is done, it is nice you can update all the dataset quite easily, by using the same component in ADF. And all you have to change is the 2 guids from step 1.

I hope you will find this useful 🙂

How to scale your azure sql database with SQL

An Azure sql database is super easy and cheap to setup and use. However, if you want to do some serious data manipulation, you will find the cheapest versions are to slow to use, and every upgrade you make on the sql database, is a doubling in price. If you are a data engineer, like me, most of your data work will be in batches, so it will also be annoying to pay for an expensive version, if you only use it for 1 hour/day.

Luckily, there is a solution. You can change the performance / version of the SQL server with SQL.

To check which version you are running, use this SQL

SELECT     
  slo.edition,    
  slo.service_objective    
FROM sys.database_service_objectives slo   

And you will get a result like this

You can change the version with this SQL

ALTER DATABASE DSA MODIFY(EDITION='Standard' , SERVICE_OBJECTIVE='S4')

Unfortunately, the change is not instant. My experience is, that on the standard version, the latency is around 5-10 minuttes.

What i normally do, is that I have a job that starts 30 minutes before my batch job, that update the database to a higher version. Then it is updated when the batch starts. And I set the batch job to downscale the database in the end.

For pricing and DTUs, see the screenshot below.

Pricing for all versions can be found here: https://azure.microsoft.com/en-us/pricing/details/azure-sql-database/single/

Have fun 🙂

How to create sql azure login and user

I use sql azure databases a lot. Both as backend, datamarts and also for data exchange layer with 3. parties.

For that, I need to create users fast and easy. There is no interface for doing that in SQL azure, so you have to do it with SQL.

Step 1: Connect to sql with manegement studio or sql Azure data studio with an admin account, and make sure you are connected to the master database.

Step 2: Create the login like so

CREATE LOGIN Testuser 
   WITH PASSWORD = 'complexpassword' 

You can now see the user

Step 3: Switch to the database where you want the user to have access and run this code:

CREATE USER Testuser
    FOR LOGIN Testuser

Step 4: Give the access you want the user to have. For instance reader:

EXEC sp_addrolemember N'db_datareader', Testuser

And you can now see the new user in the database under users

The default roles you can give to the users can be found here: https://learn.microsoft.com/en-us/sql/relational-databases/security/authentication-access/database-level-roles?view=sql-server-ver16

And seen below:

Doing Windows development on my android tablet with Azure

The scenario: So, I’m on the run, to a family party, a boring meeting, or something similar 🙂 Suddenly, I get this great idea for the BI project I’m working on. I didn’t bring my monster laptop, because it is to heavy & ugly. Instead I’m sitting with my android tablet. What to do now??? 🙂 A solution I have started to use, is the Azure virtual machines. You can create your own on the azure portal, and you can even get them with the software you need preinstalled. I won’t describe the procedure here, because it is simple and out the box. One of the new good things, is that you only pay for it, when it is online, so remember to shut it down afterwards. So how to do it? It’s described in the pics below:

My setup, an android tablet, with bluetooth keyboard

Navigate to the azure portal, and start your VM

From the portal, you can download the connection file, so you don’t have to remember the connection information. I keep it saved in dropbox. When I click it, the MS remote desktop connect to the VM.

And now I’m connected. Windows 2012 R2 on my android tablet with Metro style.

Searching the apps

Running datatools. I could connect to TFS in the cloud, and get alle the sourcecode, and start doing some work.

Querying a SQL database, potentially fixing a bug 🙂

All done! Remember to stop the VM, when you are done.

Conclusion: For me, the best way to develop, is using a powerfull laptop, connected to a good keyboard, mouse, and some big screens. However, if you need to do something fast, it is possible to do some work, just using your android tablet and an Azure VM.